Tuesday, April 3, 2012

I love a good dinner party!

My super-healthy eating habits this year have been entirely incompatible with hosting elaborate and decadent dinner parties.  As much as I stress over the planning and work to be done, I absolutely love having people over for dinner.  After living in a small apartment for much of my adult life, I was overjoyed to move into Mark's house and be able to entertain with some regularity.

We've made plans to have a couple over next weekend, and I'm already getting excited about the meal and details.

To draw some inspiration, I'd like to share some photos of my first major dinner party.  We had an engagement party for about 15 people at our house last summer.  I spent several days in the kitchen, but it was well worth it!  Take a look!

Our dining room area was converted into an hors d'oeuvres and dessert area.

The dessert spread.

Simple raspberry brownie bites - thanks to Pinterest for this idea!

Strawberry mousse from scratch with graham crackers sprinkled in the bottom.  The crackers were just soft enough to taste marvelous!

Cookies, truffles, and cheesecake bites!

Red velvet cupcakes - one of the few items that I bought pre-made.


First cold-pressed EVOO, homemade spinach artichoke dip, and homemade salsa.

PB & Jelly & Fluff Sandwiches, focaccia for dipping, and Italian pasta salad.

Cheese spread with bagel crisps, pita chips, nuts, cranberries, olives, and fresh figs!

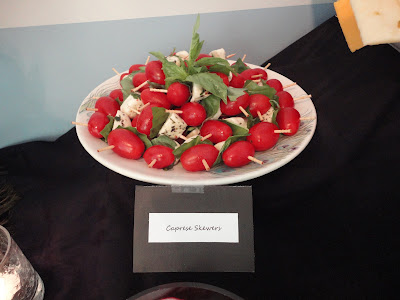
Caprese skewers.  So easy and chic!

Classic veggies & dips, shrimp & cocktail.

Lots of freshly cooked meats and sides!

The happy couple. :)

Monday, April 2, 2012

Macarons!

I loooove a good French macaron!  Unfortunately, the only nearby place I've found them is in DC proper, so macarons have become a rare treat for me.  I've been meaning to try making them at home but had been turned off by all the complaining that they're tricky, difficult, and finicky to make well.  Well, I finally took it upon myself to learn the art of macaronage and give them a try!

I spent a week or two scouring the internet for recipes, fillings, tips, tricks, and troubleshooting guides.  This post is a simplified, distilled version of what I learned.  Good luck!

Let's gather our ingredients for the shells: almond meal (I got mine from Trader Joe's), superfine sugar, confectioner's sugar, egg whites, and gel food coloring (I used Wilton coloring purchased from Michael's).


The day before, you will want to crack your eggs and separate out your whites.  Cover the whites with plastic wrap and leave out to age at room temperature.  This is safe as long as the yolks are taken out.

When you're ready to start cooking, line your cookie sheets with parchment paper.  Don't preheat the oven yet.

Mix the almond meal and confectioner's sugar together.  I used a food processor since I had a few clumps I wanted to get out.  Meanwhile, in a large bowl, pop your egg whites in and mix with a hand mixer until the whites start to foam.  Slowly add the superfine sugar and food coloring, and keep mixing medium-stiff peaks form.  When you can tip the bowl upside down without anything falling out, you're done.


Add half of your almond meal mixture to the eggs and give it a quick mix using the hand mixer.  You just want to integrate everything slightly.  Add the remaining almond meal mixture and gently fold it into the eggs.  You want to go slowly and gently, using a sweeping motion under and over until the mix is thick.

The easiest way to make lovely round circles is to use a piping bag.  You can buy bags and icing tips at just about any craft store.  I used Wilton tip #10 for this.  Pipe out your mix into small circles a little smaller than a half-dollar.  The circles will expand slightly, but you can pack them pretty tightly.


Once you're done piping, go sit down.  You need to wait at least 15 minutes for the mix to settle and crust over.  The circles should not feel tacky when they're ready.  I had to wait about 35 minutes, but you should budget an hour for this part.  You don't want to rush because this is the key to the frilly macaron feet that we know and love!  This is also a good time to preheat your oven to 300F.

When the macarons are ready, pop them in the oven for 18 minutes.


Ta da!  These shells rose beautifully!


Look at those frilly feet!

Let the macarons cool before transferring to a wire rack for filling.  Pair them up by size as you go.  I had some monsters and I had some itty-bitty ones.  They all came out great!

My apologies that I don't have pictures of the filling-making process.  I tried two types of fillings: a vanilla buttercream and a raspberry fruit filling.  This was my first macaron adventure, so I'm sorry to say that the buttercream filling didn't quite do it for me.  But the raspberry filling...it was fabulous!

To make the raspberry filling, you'll need an 8oz bag of frozen raspberries that have been thawed, the superfine sugar from the shells recipe, cornstarch, and lemon juice.

Drain the liquid from the bag of raspberries into a 1/2 cup measuring cup.  Mash up the berries as you're draining to get more juice - and save the berries, as we'll use them later.  When you can drain no more, fill the rest of your cup with water and add this + 2 T. water to a small saucepan.  Add 3 T. sugar, 1 1/2 T. cornstarch, and 1/2 tsp. lemon juice.  Mix this together and let the sauce come to a boil and thickens.  Remove the sauce from heat and allow it to cool completely.  I highly recommend transferring it to a separate dish and refrigerating until chilled.  This makes it much easier to fill the macarons without raspberry filling spilling everywhere.

Once the filling is chilled, you can again use a piping bag and tip to fill the shells.  I used Wilton tip#7.  You don't want to overfill the shells or the macarons tend to get messy in storage.


Voila!  An amazing first try at macarons!

Now, you'll want to store and refrigerate these puppies for a while.  The shells will absorb a bit of the filling to give them that lusty crunchy-gives-way-to-yummy texture.  Most recipes say these will store for a week, but I don't know how anyone makes them last that long.  Consolidated recipes below.  Enjoy!

French Macarons
115g almond meal
200g confectioner's sugar
100g egg whites (about 3)
20g superfine sugar
A touch of gel food coloring

1.  The night before, break eggs and separate whites.  Cover white and age at room temperature.
2.  Line cookie sheets with parchment paper.
3.  Mix almond meal and confectioner's sugar to remove clumps and integrate well.
4.  In a large bowl, whisk egg whites with a hand mixer until foamy.  
5.  Add superfine sugar and food coloring and beat until mixture stays put when bowl is tipped upside-down.
6.  Add half of the almond meal mixture to the eggs.  Pulse briefly with hand mixer to integrate.  Add remaining almond meal mix and gently fold in by hand.  Continue until just mixed.  Batter will be thick.
7.  Add the batter to a piping bag and pipe half-dollar sized circles onto cookie sheets.
8.  Allow the circles to form a crust.  This takes 15 minutes to an hour.  Preheat your oven at this time to 300F.
9.  Bake circles for 18 minutes.  Allow to cool for a few minutes before removing to wire rack and pairing up by size.
10.  When completely cool, pipe filling onto the inside of one shell and top with the matching shell.
11.  Allow macarons to refrigerate for about a day for best taste and texture.

Raspberry Filling
8oz bag frozen raspberries, thawed
3 T. superfine sugar
1 1/2 T. cornstarch
1/2 tsp. lemon juice

1.  Drain the liquid from the bag of raspberries into a 1/2 cup measuring cup.  Mash up the berries as you're draining to get more juice - and save the berries, as we'll use them later.  
2.  When you can drain no more, fill the rest of your cup with water and add this + 2 T. water to a small saucepan.  
3.  Add the sugar, cornstarch, and lemon juice.  Mix this together and let the sauce come to a boil and thickens.  Remove the sauce from heat and allow it to cool completely.  
4.  Transfer to a separate dish and refrigerating until chilled.

Sunday, April 1, 2012

Quick Meal: Ravioli Innamatori

I wanted to share one of my favorite quick dinner recipes.  I came across this dish at a tiny hole-in-the-wall Italian place in San Diego and had to figure it out for myself!

When I say this is quick and easy, I really mean it!  It takes just 5 ingredients and less than10 minutes to have a very flavorful and filling meal!

Let's round up the ingredients: pre-made ravioli of your choice, heavy cream, gorgonzola cheese, butter, and walnuts.


While you're working on your sauce, start boiling your water and cooking the ravioli.  I find that starting the sauce just before I toss the ravioli in gives me just the right amount of time for everything to be done simultaneously.

Now let's slice off about a tablespoon of butter and put that in a skillet on medium-low to medium.  Be careful not to let it get too hot.  We want to saute the walnuts without browning the butter too much.

Once the butter gets nice and melty, add in the walnut pieces.  I used a half cup here, but you can add more or less depending on your preference.  You can also smash the pieces to a fine walnut dust beforehand if you prefer that texture.


How good does that look?!

I love sauteing anything in butter.  I love the smell and the sight.  Yum!

Let the walnuts saute for a few minutes.  We just want to capture a little bit of walnut flavor.  Now, let's add in the heavy cream and cheese.  Depending on how much you love gorgonzola cheese, you may want to adjust the ratio here.  I use about a cup and a half of cream and about 3oz of cheese.  This gives me a pretty full, cheesy taste.  Go ahead and taste the sauce as you're making it.  If it's a bit heavy on flavor, you can add more cream to smooth it out a bit.


Let the cheese melt completely, stirring occasionally until the sauce becomes smooth.  By now, the ravioli should be ready to drain and smother with this delicious sauce.


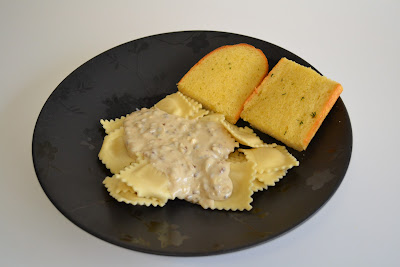
Pop the ravioli and sauce on a plate, and bam!  You're done!  I like to make a bit of garlic bread to sop up all the leftover loveliness!  No garnishes or fancy presentation this time.  It's a quick and easy meal that's perfect for a weeknight!  Easy to read recipe is below!  Enjoy!

Ravioli Innamatori
Serves 3-4
Prep Time: 10 minutes

1 T. butter
1 1/2 c. heavy cream
3 oz. gorgonzola cheese crumbles
1/2 c. walnut pieces
1 package Buitoni ravioli

1.  Prepare ravioli per package instructions - boil for 7-9 minutes.
2.  Heat butter in a medium skillet over medium heat and saute walnuts for a few minutes.
3.  Add heavy cream and cheese and stir occasionally until melted.
4.  Drain ravioli and top with Innamatori sauce.
5.  Enjoy!

Saturday, March 31, 2012

P90X Day 90

Today is Mark's and my final day of the P90X program.  We made it through a full 90 days of grueling hour+ workouts every day.  We completely changed the way we ate and followed the nutrition plan precisely.  Yes - this means we made it a full 90 days without beer, wine, butter, bacon, chocolate, candies, chips, or any kind of culinary loveliness!  It was excruciating at first, tolerable in the middle, and it's second nature by now.  We'll have champagne tonight at midnight to celebrate and maybe an indulgence or two on Sunday, and then it's back to the gym/basement/dungeon on Monday.

I love the way I look and feel now, so I'm now on a quest to maintain my new, healthier lifestyle while still mixing in my love for wine, cooking, and pork fat.  So I'm going to continue doing the strength training workouts I've been doing while mixing in some more varied cardio options.  I'd love to start doing 5Ks again, and I'd LOVE to do the Color Run when we get back from our honeymoon!


I'll be posting our before/after pictures and measurements after we do body fat measurements at the gym tomorrow.  I'm very excited to show the final results!

Friday, March 30, 2012

Professional Plant Murderer

I kill plants for a living.  Really, I feel like this every spring and summer.  I inevitably start the growing season full of energy and excitement, and I run off buying seed kits and soil only to murder my little seedlings before they even make it a few weeks.  It's not that I completely neglect them...I just have no idea where I go wrong.

Plant Graveyard?
photo by M. Markus

This year, I was inspired to make a fresh start.  Mark (my fiancé) and I are just finishing an intense diet and workout routine called P90X, and it's shifted our diet toward more fruits and vegetables.  Our weekly grocery trips have gotten pretty expensive as a result, so I wanted to offset that cost a bit by trying to grow our own.  On a side note: living in a townhouse with a tiny yard whose soil is mostly clay means you have to buy lots of pots and lots of soil.  This isn't the cost-saving I had in mind.  :/

Anyway, I bought a whole host of gardening books.  I wanted to do this right.  I may have gone a bit overboard...but so far this year, there have been no plant murders at my hands...yet.  This morning, I got the shot in the arm I needed to continue.  One of our strawberry plants is starting to form minuscule little fruits for us!  Hooray!  There's hope!

Welcome!

Hello and welcome to my lifestyle blog!

I'm Natalie, and I've started this blog as a way to get all the happiness in my life onto paper and hopefully into others' lives as well.  It has taken me a long time to get to the place I am now, and I want to take advantage of that journey as best I can.

I want to share the loves of my life with the world - my family, my cats, my love of food and wine and travel and adventures (suburban and abroad).  I have such a difficult time with introductions - I think I'll dive right in instead. :)